")
")

Menyulap CentOS 5.x, 6.x Menjadi Linux, Apache, MySql PHP (LAMP) Server

Catatan Awal
Dalam tulisan ini, saya akan menunjukkan kepada anda proses menginstall Linux Apache Mysql PHP standar pada CentOS 5.6 server. Saya pikir tidak ada perbedaan dalam konfigurasi CentOS 5 dengan Fedora / CentOS versi sebelumnya.
Langkah-langkah dalam tulisan ini mudah untuk diikuti dengan pendekatan langkah-demi langkah.
Pada SLES / openSUSE terdapat pilihan pattern pada software management Yast, karena pada CentOS tidak memiliki fasilitas serupa, maka kita perlu menginstall paket-paket secara manual. Konfigurasi dilakukan di komputer virtual yang akan dijadikan High Avaibility WebServer. Operating System yang digunakan adalah CentOS 5.6 64 Bit dan bisa diaplikasikan pada CentOS versi lain.
Asumsi
Diasumsikan CentOS 5.6 sudah berjalan dengan baik serta dapat dioperasikan secara normal, dalam hal ini server sudah terhubung dengan jaringan dan dalam kondisi siap pakai. Langkah-langkah berikut dapat dilakukan pada OS yang masih fresh maupun sedang berjalan. Tidak ada paket spesial ataupun konfigurasi khusus, anda hanya perlu memastikan kalau anda bisa menginstall paket melalui repositori.
Konfigurasi Awal
Komputer diinstall dengan:
Hostname : server1.test.env
IP Address : 192.168.12.254
Install MySql Server
yum install -y mysql mysql-servermysql mysql-server mysql-devel
Rubah password root mysql:
mysql_secure_installation
NOTE: RUNNING ALL PARTS OF THIS SCRIPT IS RECOMMENDED FOR ALL
MySQL SERVERS IN PRODUCTION USE! PLEASE READ EACH STEP CAREFULLY!

In order to log into MySQL to secure it, we'll need
the currentpassword for the root user.  If you've
just installed MySQL, andyou haven't set the root
password yet, the password will be blank, so you
should just press enter here.

Enter current password for root (enter for none): <== Enter
OK, successfully used password, moving on...

Setting the root password ensures that nobody can log into the
MySQL root user without the proper authorisation.

Set root password? [Y/n] <== Y
New password: <== password_baru
Re-enter new password: <== password_baru
Password updated successfully!
Reloading privilege tables..
... Success!

By default, a MySQL installation has an anonymous user, allowing
anyone to log into MySQL without having to have a user account
created for them.  This is intended only for testing, and to
make the installation go a bit smoother.  You should remove
them before moving into a production environment.

Remove anonymous users? [Y/n] <== Y
... Success!

Normally, root should only be allowed to connect from
'localhost'.  This ensures that someone cannot guess at the
root password from the network.

Disallow root login remotely? [Y/n] <== Y
... Success!

By default, MySQL comes with a database named 'test' that
anyone can access.  This is also intended only for testing,
and should be removedbefore moving into a production
environment.

Remove test database and access to it? [Y/n] <== Y
- Dropping test database...
... Success!
- Removing privileges on test database...
... Success!

Reloading the privilege tables will ensure that all changes
made so farwill take effect immediately.

Reload privilege tables now? [Y/n] <== Y
... Success!

Cleaning up...

All done!  If you've completed all of the above steps, your
MySQL installation should now be secure.

Thanks for using MySQL!
Catatan:
Pada pertanyaan Disallow root login remotely? [Y/n] , saya pilih Y untuk mencegah remote akses dari selain Localhost. Jika anda menginginkan akses dari luar, silakan masukkan N .
Install Apache2
yum install httpd httpd-devel
Install PHP
yum install php php-mysql php-common php-gd php-mbstring php-mcrypt php-devel php-xml
restart apache2
/etc/init.d/httpd restart
Tahap terakhir, kita buat file index untuk ditempatkan di direktori web.
echo “Selamat, Webserver anda sudah berjalan” > /var/www/html/index.html
Buka firefox atau Google Chrome dan akses ke IP 192.168.12.254 (sesuaikan dengan IP anda). Seharusnya anda akan muncul tulisan:
Selamat, Webserver anda sudah berhasil.
Install dan konfigurasi phpmyadmin
Kita akan menambahkan phpmyadmin untuk memudahkan memanage mysql kita melalui web. Sebelumnya kita harus menambah repository diluar repository yang sudah ada.
CentOS 64 bit gunakan perintah berikut:
rpm -Uhv http://apt.sw.be/redhat/el5/en/x86_64/rpmforge/RPMS//rpmforge-release-0.3.6-1.el5.rf.x86_64.rpm
CentOS 32 bit gunakan perintah berikut:
rpm -Uhv http://apt.sw.be/redhat/el5/en/i386/rpmforge/RPMS/rpmforge-release-0.3.6-1.el5.rf.i386.rpm
lalu check repository sudah ada atau berlu dengan perintah yum repolist jika berhasil maka akan muncul daftar repositori baru sebagai berikut:
rpmforge Red Hat Enterprise 5 - RPMforge.net - dag enabled: 10,687
Rubah prioritas repository rpmforge dengan cara:
1. Install paket yum priorities
yum install yum-priorities
2. Edit file rpmforge.repo
nano /etc/yum.repos.d/rpmforge.repo
tambahkan satu baris berikut priority = 10 dibawah baris
### Name: RPMforge RPM Repository for RHEL 5 - dag
### URL: http://rpmforge.net/
[rpmforge]
name = RHEL $releasever - RPMforge.net - dag
baseurl = http://apt.sw.be/redhat/el5/en/$basearch/rpmforge
mirrorlist = http://apt.sw.be/redhat/el5/en/mirrors-rpmforge
#mirrorlist = file:///etc/yum.repos.d/mirrors-rpmforge
enabled = 1
protect = 0
gpgkey = file:///etc/pki/rpm-gpg/RPM-GPG-KEY-rpmforge-dag
gpgcheck = 1
priority = 10
3. Cek konfigurasi dengan melakukan perintah berikut:
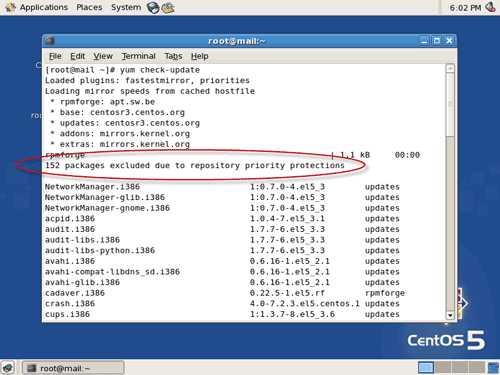
yum check-update
Anda akan mendapat pesan proteksi prioritas, seperti gambar berikut:
Sekarang sudah bisa kita install phpmyadmin
yum install phpmyadmin
Sekarang saatnya kita restart apache2 dan test phpmyadmin melalu http://192.168.12.254/phpmyadmin.
Selesai.
Selamat mencoba